

Inside this article :
You’ve broken the monolith. Your services are independent, your teams are moving fast, and Kubernetes is humming along. Then reality sets in: how do you manage traffic between 30 microservices? How do you enforce mTLS across service boundaries? How do you debug a latency spike that spans six hops?
This is where Istio earns its place in your stack.
Istio is the most widely adopted service mesh for Kubernetes, and for good reason. It handles the cross-cutting concerns of distributed systems traffic management, security, and observability without requiring you to rewrite a single line of application code. This guide walks you through what Istio actually does and how to put its core features to work in a real microservices environment.
What Is Istio and Why Do Microservices Need It?
A service mesh is an infrastructure layer that controls how services communicate. Istio implements this by injecting a sidecar proxy (Envoy) into every pod in your cluster. All inbound and outbound traffic passes through these proxies, which the Istio control plane configures centrally.
Without a service mesh, each microservice team is responsible for implementing retry logic, circuit breaking, timeout handling, and mutual TLS independently, typically through language-specific libraries. That approach creates inconsistency, version drift, and gaps across polyglot environments. Istio moves all of that to the infrastructure layer, making it uniform regardless of what language your services are written in.
The core capabilities Istio delivers:
- Traffic management: fine-grained routing, canary releases, A/B testing, fault injection
- Security: automatic mTLS between services, authorization policies, certificate rotation
- Observability: distributed tracing, metrics, and access logs out of the box
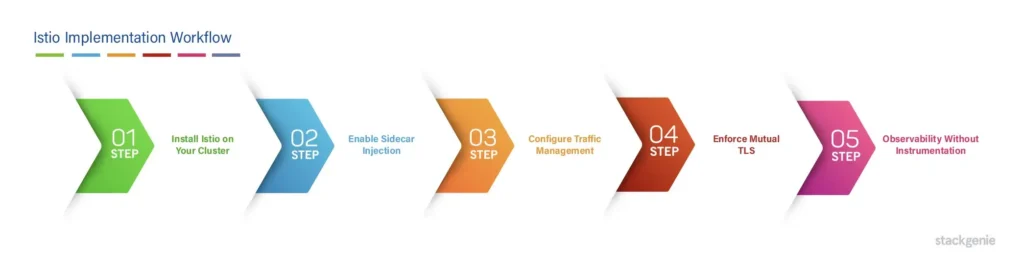
Step 1: Install Istio on Your Cluster
Istio ships with several built-in configuration profiles. For most teams getting started, the demo profile is the right choice, as it enables all core features and comes pre-configured for tracing and visualization. Before installing, ensure your cluster meets the minimum resource requirements: at least 4 vCPUs and 8GB RAM, as Istio’s control plane is resource-intensive.
Installation is handled through istioctl, Istio’s dedicated CLI. Once installed, you verify that the control plane components istiod, the ingress gateway, and the egress gateway are all running healthy in the istio-system namespace. This takes just a few minutes on a well-provisioned cluster.
Which Istio profile fits your environment?
StackGenie’s platform engineering team can assist you in sizing and configuring Istio correctly from the beginning, helping you avoid the resource surprises that often catch teams off guard.
Step 2: Enable Sidecar Injection
Istio’s sidecar proxy needs to be injected into your application pods. The cleanest approach is to use namespace-level injection: label the namespace once, and every pod that deploys into it automatically gets the Envoy sidecar—no per-pod configuration required.
Once the injection is active, your pods will show two running containers instead of one. That second container is the Envoy proxy handling all network traffic on behalf of your application. If you’re working with existing deployments, a rolling restart picks up the injection without downtime.
This is also the moment teams typically discover whether their workloads have any port conflicts or resource constraints that need to be addressed before going mesh-wide.
Step 3: Configure Traffic Management
This is where Istio’s value becomes tangible. Istio uses two primary resources for traffic control: Virtual Service and Destination Rule.
Canary Deployments with Weight-Based Routing
Running two versions of a service simultaneously, say, a stable release and a candidate, Istio lets you split traffic by percentage. Send 90% to the proven version while 10% flows to the new one, then shift the ratio incrementally as confidence builds. The entire operation is a configuration change, not a redeployment. No load balancer reconfiguration, no DNS changes, no downtime.
This is how modern teams do progressive delivery. The alternative, full cutover and rollback if something breaks, is both riskier and slower.
Fault Injection for Resilience Testing
Istio lets you inject faults at the network level to test how your services behave under failure conditions, without touching application code. You can introduce artificial latency on a percentage of requests or simulate HTTP errors for specific routes. This gives you a controlled environment to validate timeout behavior, retry logic, and circuit breaker configuration before real failures expose gaps in production.
Step 4: Enforce Mutual TLS
By default, Istio operates in permissive mode, accepting both plain-text and mTLS traffic to ease adoption. For production environments, permissive mode is a liability. Switching to STRICT mode means that services communicate only over encrypted, mutually authenticated connections.
In strict mode, Istio manages the full certificate lifecycle issuance, rotation, and revocation using its built-in certificate authority. Your application code never handles certificates directly. There are no shared secrets to rotate manually, no expired certificates causing 2 am incidents. Zero-trust networking between services becomes the default, not an aspiration.
Step 5: Observability Without Instrumentation
One of Istio’s most compelling features is that it generates telemetry data from Envoy proxies; your applications don’t need to be instrumented to receive it. Istio integrates with Prometheus for metrics, Grafana for dashboards, Jaeger for distributed tracing, and Kiali for service graph visualization.
Kiali is particularly powerful for platform teams. It renders a real-time topology map of your microservices, color-coded by health status. You can see traffic flow, error rates, and latency at a glance and drill into any service to understand what’s happening at the edge. Debugging a cross-service latency issue that used to take hours of log correlation now takes minutes.
Jaeger provides end-to-end distributed traces for every request passing through the mesh, provided your services propagate the standard trace headers. That propagation is the one thing Istio cannot do for you it’s a small but important code-level change.
Common Pitfalls to Avoid
Skipping resource planning. Istio’s sidecar proxies add roughly 50–100MB of memory overhead per pod. In clusters with hundreds of pods, this adds up fast. Budget for it before enabling mesh-wide injection.
Leaving permissive mode on in production. Permissive mode exists for migration, not steady-state. Move to STRICT once your workloads are stable.
Ignoring header propagation. Distributed tracing only works end-to-end if services forward trace headers between calls. Most teams discover this gap after deploying Jaeger and seeing broken traces.
Overcomplicating Virtual Services early. Start simple and add routing complexity incrementally. Overly granular Virtual Service configurations are a common source of traffic routing bugs that are painful to debug.
Istio in Production: What Comes Next
Getting started with Istio is straightforward. Operating it at scale is a different discipline. The areas that require deeper investment as you grow:
- Multi-cluster mesh: federating Istio across clusters for cross-region traffic management and failover
- Egress control: locking down outbound traffic using Service Entry resources to prevent unauthorized external calls
- Authorization policies: fine-grained, workload-level access control using JWT claims and service account identity
- Upgrade management: Istio releases frequently, and mesh upgrades require a solid runbook to avoid control plane disruption
Each of these is manageable with the right expertise and preparation. Without it, they’re the areas where production Istio deployments most commonly run into trouble.
Ready to Adopt Istio Without the Trial and Error?
Istio solves real problems in microservices architectures traffic management, zero-trust networking, and out-of-the-box observability are things every distributed system eventually needs. The question is whether you build that operational knowledge through months of trial and error, or partner with a team that’s already done it.
StackGenie works with Kubernetes-native teams at every stage of the Istio journey, from initial evaluation and installation through production hardening, multi-cluster federation, and upgrade management.
If you’re evaluating Istio for your environment, planning a service-mesh migration, or looking to get more out of an existing deployment, we’d like to help.
StackGenie is a cloud-native consulting firm specializing in Kubernetes, DevOps, and platform engineering. Visit stackgenie.io to learn more.
Let's talk Istio expert?
Contact Us NowFrequently Asked Questions
Q1: What does Istio do for microservices?
Istio manages how microservices communicate on Kubernetes — handling traffic management, mTLS security, and observability without any changes to your application code.
Q2: How does Istio work in Kubernetes?
Istio injects an Envoy sidecar proxy into every pod. All traffic passes through these proxies, configured centrally by Istiod, making traffic policies and security rules transparent to your application.
Q3: What is the difference between VirtualService and DestinationRule in Istio?
A VirtualService defines how traffic is routed — for example, splitting 90/10 between two versions for a canary release. A DestinationRule defines policies after routing, like load balancing and circuit breaking. Both work together for fine-grained traffic control.
Q4: How do I enable mTLS in Istio?
Apply a PeerAuthentication policy set to STRICT mode for your namespace or mesh-wide. Istio’s built-in certificate authority then handles all certificate issuance and rotation automatically.
Q5: What observability tools does Istio integrate with?
Istio integrates with Prometheus (metrics), Grafana (dashboards), Jaeger (distributed tracing), and Kiali (service graph). The Envoy sidecar generates telemetry automatically — no application instrumentation needed.
Q6: What is the resource overhead of running Istio?
Each Envoy sidecar adds roughly 50–100MB of memory per pod. The control plane requires a minimum of 4 vCPUs and 8GB RAM. Plan for this before enabling mesh-wide injection.
Q7: What are the most common Istio mistakes to avoid?
The four most common: leaving permissive mTLS on in production, underestimating sidecar memory overhead, skipping trace header propagation, and over-engineering VirtualService configurations too early.
Q8: What comes after the initial Istio setup?
Production Istio requires deeper work in multi-cluster federation, egress control via ServiceEntry, fine-grained authorization policies, and a solid upgrade runbook for control plane updates.


