Whilst deploying applications on EKS using Terraform is a straightforward process, there are some tools and prerequisites you will need to have on hand to be successful. This tutorial is for use within an AWS cloud platform setting and will take you through the processes to:
- setup EKS
- configure GitOps Actions,
- create Argo CD, and a
- sample application on Kubernetes cluster
The end result will be an automated deployment mechanism using GitOps concept.
Components:
For this deployment project, you will need:
- AWS EKS (Elastic Kubernetes Service) | a reliable and scalable managed Kubernetes service
- GitHub | a cloud-based hosting platform where developers can store, manage, track, and control changes to their code
- Terraform | an open source infrastructure as code (IaC) tool
- GitHub Actions | a CI/CD tool that helps create workflows to compile, test and deploy your code.
- Argo-CD | a GitOps continuous delivery tool for Kubernetes
You will find the prerequisite conditions for each of these tools in the Prerequisites section.
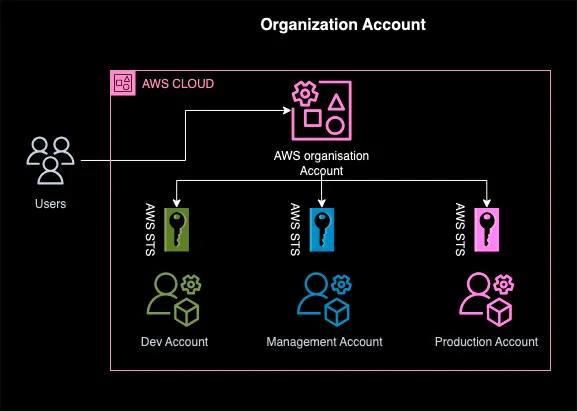
Organisation account architecture
Before you begin the application deployment, review the design of the AWS account architecture. As you can see in the diagram below, the AWS account architecture is made up of three accounts: developer, management and production. Please be aware that whichever account you have selected at the time of deployment through the GitHub actions and Argo CD, that is where your application will be deployed. For example, if you have selected the Management account, your application will deploy in the Management account.
Prerequisites
The code supplied in this tutorial will automatically install and configure the prerequisite tools. If you expect to make modifications to the code, or will be working on a local machine, do make sure you have these tools handy:
- Install and configure AWS CLI
- Terraform
- Kubectl
- ArgoCD
- Create a public hosted zone in Route 53
- Request a public certificate with AWS Certificate Manager
(Refer to the tutorial links above for more clarity and guidance.)
AWS EKS & GitHub Prerequisites
Using Amazon Elastic Kubernetes Service (Amazon EKS) makes it easy to manage, deploy and scale containerised applications on both AWS and on-premises systems. And utilising the collaboration tool GitHub makes contributing code to open source projects simple.
Manually perform the following steps on both AWS and GitHub to prepare your application deployment:
- Create AWS Organisation accounts for Developer, Staging/ QA, and Production
- Create an s3 bucket to store the terraform state file.
(The bucket should have versioning and default encryption enabled) - Ensure that a DynamoDB table is present to store terraform state-lock files.
- Create an s3 bucket to store the Helm values file.
(Refer to step 7 in section 5) - Enable IAM Roles in all accounts (dev, staging and prod)
(IAM users in the main account will have the privilege to access this role) - Ensure that an IAM user is present in the main account with the following capabilities:
- Programmatic access
- Authority to access (sts assume role) roles in the follower accounts
- Permission to access s3 for tf-state upload and DynamoDB table to upload tf-state lock file
- Ensure that a GitHub API token is present for GitHub Actions
GitHub Action Prerequisites
As a software workflow automation tool, GitHub Actions, makes code reviews, managing branches and issuing triaging work straightforward. For the purpose of this application deployment, you will use GitHub Actions for the Continuous Integration and branch management. The Prerequisites for GitHubs Actions Integration is:
- Add AWS credentials as Git Secrets (see tutorial)
Terraform Prerequisites:
As an open source infrastructure as code tool (IaC), with Terraform you can build, change and version your infrastructure safely and efficiently. It also includes automatic infrastructure management and significantly reduces provisioning time.
This code will result in the deployment of a single node infrastructure (refer to section 5). If you wish to make modifications to the infrastructure, make sure that all of the criteria below are present:
- A single node infrastructure (for high availability you can change the node count and add multi-AZ)
- A virtual private cloud (VPC) configured with public and private subnets according to AWS best practices
- In the public subnets:
- Managed network address translation (NAT) gateways to allow outbound internet access for resources in the private subnets
- In the private subnets:
- A group of Kubernetes nodes
- An Amazon EKS cluster, which provides the Kubernetes control plane.
- An EFS storage
ArgoCD Prerequisites:
As a GitOps continuous delivery tool for Kubernetes, Argo CD continuously monitors running applications through its Application Controller. It helps compare the live application with the desired state defined in the Git repository.
Here, Argo CD is used to deploy the infrastructure and applications on Kubernetes. Before deployment, these need to be present in the EKS cluster:
- A Nginx Ingress Controller
- An External DNS for EKS
- A sample web application
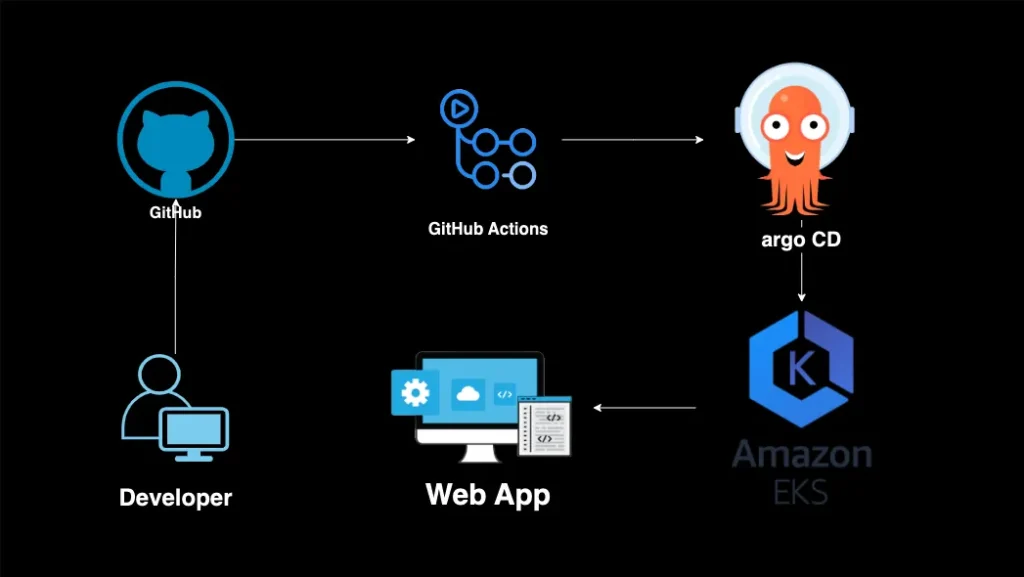
Deployment Architecture
A sequence of events leads to the deployment of your web application, as the architecture diagram below shows. First, the developer commits the developed code to GitHub. Then, GitHub Actions are triggered, creating a container for the code to be built in. This code is automatically pushed to Argo CD where deployment of the cluster occurs on Amazon EKS.
Your web application is now live and accessible to the public.
Deploy your Application
Once your tools and prerequisites are ready, you can deploy your application. Follow the steps below (using the tutorial links if you need them) to take you through the process:
-
- Create a repo on your GitHub account and complete following steps:
- Create a GitHub personal access token
- Add GitHub secrets on the repo
(The repository secret variable (Name) that you have given here also needs to be replaced in the GitHub action manifest.)
- Clone the GitHub repositories using the code given below:
git clone https://github.com/stackgenie/stackgenie-devops-eksapp.git
- Replace the main.tf file with the AWS s3 bucket name that you created for storing your Terraform State File and Dynamo DB Table Name, as outlined below:
- Create a repo on your GitHub account and complete following steps:
terraform {
backend "s3" {
bucket = "terraform-tfstate-bucket-name"
region = "eu-west-2"
dynamodb_table = "yourtablename-terraform-state-locking"
}
}
- Make the necessary changes to the variable.tfIn the eks.tf file, use the SPOT instance for cost optimisation. For ‘production’, you must choose ‘on-demand instances’. (reference)
- Make the necessary changes to the main.yml (.github/workflows/main.yml).
- Upload your yaml files from dir values-files to the s3 bucket.
- The Argo CD values file should be:
server:
ingress: enabled: true
annotations:
kubernetes.io/ingress.class: nginx
nginx.ingress.kubernetes.io/force-ssl-redirect: "true"
nginx.ingress.kubernetes.io/ssl-passthrough: "true"
nginx.ingress.kubernetes.io/backend-protocol: "HTTPS"
hosts:
- HOSTNAME
- The external-DNS values file should be:
domainFilters:
- DOMAIN_NAME
serviceAccount: annotations:
eks.amazonaws.com/role-arn: DNS_ARN
(You can find the values files inside the Cloned Repo.)
- The Argo CD values file should be:
Deploy your application through three different stages:
- Stage 1 Terraform Deployment
For Terraform deployment, you need to make changes on Terraform Variables. Only three values are allowed: Terraform “apply”, “destroy” and null (“ ”)TF_VERBOSE: 'apply/destroy' Terraform “apply” will provision the infrastructure For deprovisioning, follow the steps outline in section 7 Keeping the value as null (“ “) will make no changes (it will cause the nulled steps to be skipped)
- Stage 2 Argo CD deployment, along with External-DNS and Nginx ingress controller
For Argo CD deployment, only two values are allowed: Argo “install” and “uninstall”.- Insert your Route53 domain for the hosted zone/s in the code below, e.g. env.yourdomain.com
- Insert your hostname with domain FQDN in the code below, e.g. argocd.env.yourdomain.com
ARGO_VERBOSE: 'install/uninstall'
DOMAIN_NAME: 'dev.yourdomain.com'
ARGO_HOSTNAME: 'argocd.dev.yourdomain.com'
(Leave the ARGO_VERBOSE as null (“ “) if you want to skip this step.)
- Stage 3 Sample Web Application deployment
To create a sample web application deployment, create a git repo and add this manifest file to it:--- apiVersion: v1 kind: Namespace metadata: name: sample --- apiVersion: apps/v1 kind: Deployment metadata: name: hello-app namespace: sample spec: selector: matchLabels: app: hello replicas: 2 template: metadata: labels: app: hello spec: containers: - name: hello image: "gcr.io/google-samples/hello-app:2.0" --- apiVersion: v1 kind: Service metadata: name: hello-service namespace: sample labels: app: hello spec: type: ClusterIP selector: app: hello ports: - port: 80 targetPort: 8080 protocol: TCP --- apiVersion: extensions/v1beta1 kind: Ingress metadata: name: test-ingress namespace: sample spec: rules: - host: sample.yourdomain.com http: paths: - backend: serviceName: hello-service servicePort: 80- Change the following variables before the deployment of the application:
WEBAPP_VERBOSE: ""
- Use “install” to deploy the application, and “uninstall” to remove it.
- Update the following lines in the web app action file in “actions/web-app-action/entrypoint.sh”:
argocd repo add https://github.com/your-repo-name.git --name sample
argocd app create sample
        --repo https://github.com/your-repo-name.git
        --revision branch-name
        --path .
        --dest-namespace web-app
        --dest-server https://kubernetes.default.svc
(If you are using a private repo then use: -username your-github-username –password your-github-password/token with argocd repo add command.)
- Change the following variables before the deployment of the application:
- Make these changes before the end-to-end deployment:
- Give the reference branch
on:
   push:
     branches:
     - your-branch-name
   pull_request:
     branches:
     - your-branch-name
(When a push is triggered on this branch, it will trigger the deployment)
- Specify the environment where the deployment will happen. ie. dev, mgmt, or prod
WORKSPACE_ENV: 'your-env'
- Give the reference branch
Commit and push your changes to trigger the build
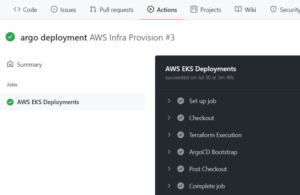
(You can monitor the build’s status by selecting the ‘Actions’ tab of your repo. A tick mark will show once each job has been successful – you can check the job logs by clicking the arrow beside each job.)
- Perform the following steps within the Argo Console Login:
- The Argo Console Login requires a username and password
- Access the Argo CD password from the SSM Parameter Store
- Your default username will be ‘admin’.
(This username has already passed as a parameter in the Argo CD entrypoint file.) - Use the following Command to get the Argo CD password from SMM:
aws ssm get-parameter --name ARGO_LOGIN_SECRET
  --profile "your-accounts-cli-profile-name" --query Parameter.Value
  --output text | openssl aes-256-cbc -d -a -iter 2 -k "your-cluster-id"
Testing your Application
Once you have deployed your application, you will need to test it to see if it works. If you have been successful, you will get the message: “Hello World!!” When you’ve entered the app URL in your browser.
If you have been unsuccessful, we recommend reviewing the code you have used for inaccuracies and mistakes and running through each of the steps as explained above.
De-provisioning Your Application
Follow these steps to deprovision your application:
- Change the value: (WEBAPP_VERBOSE) to uninstall.
(Only move onto Step 2, once this step is complete.) - Remove Argo CD.
(Only move onto Step 2, once this step is complete.) - Destroy the infrastructure using Terraform.
(Only add destroy verbose once you have completed Steps 1 and 2. Before that, leave TF_VERBOSE as null.)
Conclusion
We hope this tutorial was helpful. For more advanced learning, explore other posts from Stackgenie’s experts in our Tech Corner.